Pain surprise / Surprise bread
Makes: 1
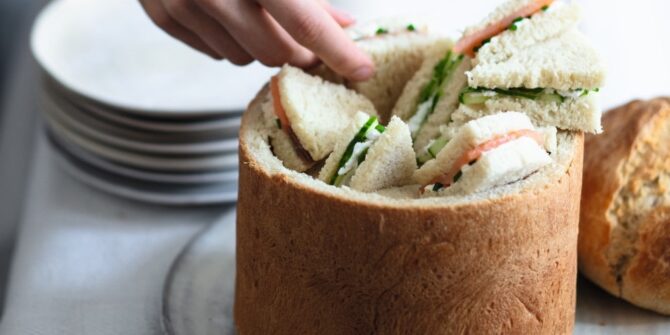
If you think there’s nothing better than a good-old loaf of fresh French bread, think again. This soft white loaf has a secret surprise; tasty sandwiches hiding inside! A real crowd-pleaser for a picnic or party, you can use any sandwich fillings of your choice.
Ingredients
For the bread
- Scant ½ cup (3.5 oz./100 g) water
- 0.35 oz. (10 g) fresh yeast
- 5⅔ cups (1 lb. 8 oz./700 g) bread flour (T65)
- 5 tsp (0.75 oz./20 g) sugar
- 2¾ tsp (0.5 oz./14 g) salt
- 1⅔ cups (14 oz./400 g) whole milk
- 1.75 oz. (50 g) refreshed levain
- Scant 1 tbsp (0.5 oz./14 g) butter, at room temperature + 1 tbsp (0.5 oz./15 g) for the pan
For the fillings
- Your finger sandwich fillings of choice
Directions
For the bread
1Place the water and yeast in the bowl of a stand mixer fitted with the paddle attachment and stir or swish to dissolve the yeast.
2Add the flour, sugar, salt, milk, and levain. Knead for 5 minutes on speed 1, followed by 3–4 minutes on speed 2, until the dough is smooth and elastic and pulls away from the sides of the bowl.
3With the mixer running on speed 1, incorporate the scant 1 tbsp (0.5 oz./14 g) butter.
4Cover the bowl and let rise in a warm place for 1½ hours. Fold the dough once or twice during the rise time (bulk fermentation*).
5Turn the dough out onto a floured work surface and shape it into a ball.
6Thoroughly grease the cake pan with the 1 tbsp (0.5 oz./15 g) butter and place the dough in the pan, seam side down. Let rise in a warm place for 1–1½ hours (proofing*). Toward the end of the rising time, preheat the oven to 400°F (200°C/Gas Mark 6).
7When the dough passes the poke test* (SEE BELOW), bake the bread for 30–40 minutes.
8Turn the bread out of the pan and let cool completely on a rack before cutting.
Assembling the bread
1To cut out the center of the bread, stand it up on its base and insert a knife, blade parallel to your work surface, into the side, ½ in. (1 cm) up from the base.
2Carefully work the knife around the loaf until you have made a clean cut halfway round.
3Repeat from the other side of the bread until you’ve cut completely through. Reserve the slice you cut off for another use, and flip the bread over so the cut side is uppermost.
4Insert your knife vertically into the crumb, ½ in. (1 cm) in from the crust.
5Cut around the inside of the crust, leaving a ½-in. (1-cm) border all the way around.
6Carefully remove the bread core and cut it crosswise into rounds with a thickness of standard sandwich bread.
7Top half of the rounds with your fillings of choice and cover with the remaining rounds.
8Cut each sandwich into 8 equal pieces and arrange inside the hollowed-out bread. Keep in the refrigerator until serving.
LA BONNE IDÉE
- The filling possibilities are infinite, so feel free to play around. Here are some favorites.
- Savory fillings: smoked salmon/cream cheese, goat cheese/cucumber, artichoke spread/cured ham, tapenade/crushed hazelnuts, mayonnaise/grated hard-boiled egg, etc.
- Sweet fillings: raspberry jam, lemon curd, gianduja (chocolate-hazelnut paste), etc.
POKE TEST
- If the proofing time is too short, the dough won’t build up enough CO2 to rise correctly during baking. Conversely, if the proofing time is too long, the gluten network weakens and the bread may fall during baking. Even professional bakers use the poke test to evaluate the dough’s resistance and determine when it is ready for the oven. Gently press your finger about ½ in. (1 cm) into the dough. If the dough is ready to bake, it will spring back slowly but retain a small indentation where you poked it. If no indentation forms, the dough is not ready; leave it to proof a little longer. If the indentation doesn’t spring back at all, it’s too late—the dough is over-proofed.
Extracted from Upper Crust: Homemade Bread the French Way by Marie-Laure Fréchet (Flammarion, 2021).
Photography © Valérie Lhomme.
Share to: Facebook Twitter LinkedIn Email
More in Baking, Bread, Recipe, Side, Starter
Related Posts